featuring guest authors; crafting tips and projects; recipes from food editor and sleuthing sidekick Cloris McWerther; and decorating, travel, fashion, health, beauty, and finance tips from the rest of the American Woman editors.

Note: This site uses Amazon affiliate links. As an Amazon Associate, I earn from qualifying purchases.

Thursday, September 30, 2010

BOOK CLUB FRIDAY -- GUEST AUTHOR JESSIE CROCKETT


Today’s Book Club Friday guest mystery author is Jessie Crockett. A nearly life-long resident of the Granite State, Jessie naturally adores black flies, 98% humidity, killing frosts in August and snow banks taller than the average grandmother. When not working on her next murderous adventure she enthusiastically putters in her greenhouse, designs bento lunches and throws parties.  She delights in mentoring young writers at the local elementary school. Jessie lives with her dark and mysterious husband and exuberant children in a village so small most other New Hampshire residents have never heard of it. Hearing from readers makes her day so please drop by for a visit at jessiecrockett.com.

Jessie is offering a copy of
Live Free or Die to one lucky person who posts a comment to the blog this week. -- AP

How Knitting Taught Me to Be a Writer
It was the birthday sock project that started it all.  I mentioned to a friend, who was a knitter, how I had always wanted to learn to knit socks.  She promptly signed us both up for a sock knitting workshop at a local yarn store.  I arrived at the class enthusiastic and completely unaware of how unprepared I was for the task ahead.

The teacher took my measure almost immediately and moved her folding chair next to mine in the knitting circle.  I am embarrassed to admit I received far more than my fair share of her attention that day.  While other students ribbed like fiends and fashioned gussets I fumbled with my shiny new set of double pointed needles and wished I could grow a second set of hands.

By the end of the day I was the proud owner of a single baby sock, mostly knitted by the instructor.  I thought I had a basic understanding of the process and purchased more yarn and needles to make a pair for myself.  The instructor just shook her head at my foolishness as she rang me up.  Even my very kind friend asked if I was sure I wanted to keep trying.

Later that evening, stretched out on my sofa, I began what I was sure would be a masterpiece.  Chanting “knit, purl, knit, purl” under my breath I tackled the ribbing.  No matter what I did extra knit stitches appeared at the end of each round and the sock careened off in unintended directions.

I kept at it though and a couple days later took all seven inches of it to show to an elderly neighbor who was a dedicated knitter.  She took one look and asked, “Would you like me to unravel it for you dear?”  She gave me some pointers as I watched hours of work turn once more into a ball of fresh possibilities.

I tried again with similar results. My friend laughed at me and remarked it was possible to purchase socks.  I ignored her and kept on chanting “knit, purl, knit, purl”.  Then, one day, one of my beloved sisters saw the socks and uttered the magic words, “That’s wonderful!  Please make me a pair for my birthday!”  Armed with encouragement I dashed off to the yarn shop and purchased a softly spun yarn in midnight blue.  The color was too dark to see mistakes and the yarn snapped off at the end of almost every round. Still, I worked every chance I got on those socks and with the help of friends and neighbors managed to complete them by my sister’s birthday.

But what does this have to do with writing?  Everything.  I learned to express a dream and to go for it even if I was unprepared.  I learned to keep at it even when experts thought I was hopeless.  Knitting taught me to value the process as much as the product and to be grateful for the opportunity to learn from my mistakes.  It taught me how much a word of encouragement means when you are ready to quit. It especially taught me about doing a job over and over until it is right.  But mostly, it taught me passion and enthusiasm are enough to get a job done.

Last year, the same week I presented my sister with her annual birthday socks, I received a publishing contract for my first novel.  This year, I’m knitting her two pair.

Thanks for stopping by, Jessie, and for offering a copy of Live Free or Die as a giveaway. So readers, do you knit? Or is there something else you sucked at but stuck with it until you mastered it? Let’s hear from you. You could win a copy of Live Free or Die by posting a comments. -- AP

FASHION WITH ERICA -- LEOPARD PRINTS


Assistant fashion editor Erica Milano joins us today to discuss one of fashion’s latest trends. -- AP


Thanks, Anastasia. Have you noticed that everywhere you turn lately, it’s leopard this and leopard that? Leopard prints are once again a sizzling fashion trend. I don’t mean real leopard fur, mind you. The world doesn’t need the demise of another glorious species. I’m talking about leopard prints. 

They’re everywhere! From couture to K-Mart. And not just for women’s fashions. Guys are wearing leopard. Kids are wearing leopard. 

You’ll see leopard print accessories on everything from handbags to umbrellas to costume jewelry. Nail salons are featuring leopard print nail designs.
Even our homes are wearing leopard. Designers have embraced the leopard print with a passion rarely seen for any other decorative print. You can now find it in everything from wallpaper to lampshades to USB jump drives.

Want to be a fashionista? Think leopard the next time you’re out shopping. You’ll be the height of fashion.

Thanks, Erica. I know I’ve seen leopard everywhere lately, too. What about you readers? Are you partial to leopard prints? Where have you seen them? Have you bought anything with a leopard print design? Let’s hear from you. Post a comment this week to be entered in the drawing for a free book from our Book Club Friday guest author. -- AP


Wednesday, September 29, 2010

DECORATING WITH JEANIE -- SCARECROW YARD ART

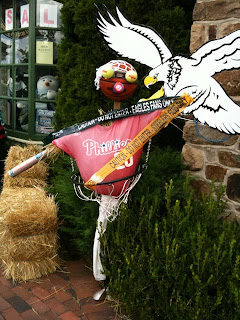
Philadelphia Sports Fan Scarecrow

Toy Story Scarecrow

"Guy Crow" Insurance
Scarecrow

"Crow"-vert Affairs
Scarecrow
Fairy Princess Scarecrow

Knight Scarecrow
"Straw" Trooper
Scarecrow

Halloween is only a month away. Today Jeanie offers a Halloween decorating idea for welcoming all those boys and ghouls who come trick or treating. -- AP

Thanks, Anastasia! Do you know that Halloween is the second biggest holiday of the year when it comes to consumer spending? Have you noticed how people are going all out to decorate their homes and yards for Halloween as much as they do for Christmas?

I recently spent a Saturday afternoon at Peddler’s Village in Lahaska, PA. As it turned out, they were having a scarecrow festival and competition. Handmade scarecrows were everywhere, many made by children. And that gave me an idea.

For those of you who like to decorate your front yard for Halloween, this year, instead of spending a ton of money, why not buy a bale of hay, grab some old clothes and craft supplies, and make your own scarecrows? Make it a family project. Trust me, you and your kids will have a blast! Just take a look at the great examples I found to spur your imagination.

Thanks, Jeanie! These are fantastic! My favorites are the “Guy Crow” Insurance Scarecrow, the “Straw” Trooper Scarecrow, and the “Crow”-vert Affairs Scarecrow, but I’m a sucker for a good pun. What about the rest of you? Which one is your favorite? -- AP

Tuesday, September 28, 2010

COOKING WITH CLORIS -- CHERRY CHOCOLATE ZUCCHINI MUFFINS

Zucchini is the gift that keeps on giving. Sick of it yet? Fear not. Today Cloris offers up a zucchini muffin with a twist. -- AP

CHERRY CHOCOLATE ZUCCHINI MUFFINS

Ingredients:
3 eggs
3/4 cup vegetable oil
3 teaspoons vanilla extract
3 cups all purpose flour
1 cup brown sugar
1 teaspoon baking soda
1/2 teaspoon baking powder
1 teaspoon salt
2 cups grated zucchini
3/4 cup chocolate chips
1/2 cup dried cherries

Beat eggs, then stir in oil and vanilla. Mix all dry ingredients together. Gradually add dry ingredients to egg mixture. Mix until smooth. Fold in chocolate chips and cherries.

Coat muffin tins with non-stick spray. Fill tins 3/4 full. Bake 20-25 minutes at 350 degrees.

Makes 15-18 muffins.

Thanks, Cloris! Eating your veggies never tasted so good. How about the rest of you? Any great zucchini recipes? 
Post a comment to be entered in the drawing for a free book from our Book Club Friday guest author. -- AP


Monday, September 27, 2010

CRAFTS WITH ANASTASIA-- NEAT KNIT TIPS

Now that there’s a hint of a nip in the air, those of you who knit and crochet have probably started a few new projects. Here are some tips for you.

*Sprinkle a small amount of talcum powder on your hands before knitting or crocheting to keep your hands from perspiring while you work.

*Use a rubber tipped bobby pin to mark the beginning of each crochet round. The bobby pin will stay in place securely and will not snag the yarn.

*Using red nail polish, mark 1” from the end of your crochet hook or knitting needle to quickly check your gauge.

*To prevent yarn from cutting into your fingers as you knit or crochet, crochet a thread thimble for yourself. Wear it on the finger the yarn wraps around.

*Slip a stitch marker onto your knitting needle every tenth stitch as you cast on for quick counting.

*Loose leaf binder reinforcement tabs make very inexpensive stitch markers.

*To keep fiberfill from showing through crocheted animals and dolls, stuff the piece first to determine the amount of fiberfill needed. Then remove the fiberfill and place it in a piece of pantyhose, preferably in a color that matches the animal or doll. Place the filled piece of pantyhose back in the animal or doll.

*To keep yarn from tangling when working with more than one color at a time, place the balls of yarn inside a mesh laundry bag. String the yarn through the holes in the bag, and they will stay tangle free as you work.

*Use a hook a size or two larger to stitch your starting chain if it tends to be tighter than the rest of your crochet stitches.

*Use a music stand to hold your instructions while stitching. It can be adjusted to the proper height for easy reading.

*When adding embroidery, such as facial features, to a knitted or crocheted piece, cut a piece of felt the same color and shape as the embroidery and glue it to the crochet or knitting with fabric glue. Embroider directly over the felt for neat, even stitches.


Do you knit? Have any great knitting or crochet tips? Let's hear from you. Post a comment to be entered in the drawing for a free book from our Book Club Friday guest author. -- AP

Saturday, September 25, 2010

THIS WEEK'S BOOK WINNER

Thanks to all who stopped by this week at Killer Crafts & Crafty Killers. We hope you'll come back often and also tell your friends about us. We have lots of exciting posts and guests planned for the months ahead. I’d also like to thank Kat Henry Doran for being our Book Club Friday guest and offering a copy of OUT OF THE DARK to one of our readers who posted a comment this week. The winner this week is KK Brees. KK, if you'd  please email your mailing address to me at anastasiapollack@gmail.com. I’ll forward it to Kat, and she’ll mail your book to you. Happy reading! -- Anastasia

Friday, September 24, 2010

BOOK CLUB FRIDAY -- GUEST AUTHOR KAT HENRY DORAN

Today’s Book Club Friday guest author is Kat Henry Doran. Over the years Kat has worked as a nurse, malpractice insurance investigator, forensic nurse examiner, and victim advocate, all of which add authenticity to her writing. Kat retired her speculum a few years ago but continues to advocate, quietly, for marginalized populations through Amnesty International and Doctors Without Borders. Today she talks to us about Choosing a Setting. Read more about her at her website and blog. 

Kat is offering a copy of
Out of the Dark to one lucky person who posts a comment to the blog this week. Check back tomorrow to see if you’re the lucky winner. -- AP

Anastasia, I thank you for inviting me to your blog

CHOOSING A SETTING
I am a nurse by first profession; I've been writing for perhaps twenty-five years, published in novel length romance fiction since 2004. For the last ten years of my nursing career, I worked as an investigator for a malpractice insurance carrier. The position required me to travel the length of Upstate New York. One glorious Fall day, while driving through a small Central New York town, I passed a New York State Trooper substation. The  lone car in the parking lot sparked the “what if” process that all writers experience. What if a hot shot  police investigator from the big city is reassigned to a small town in the middle of nowhere? That became Nohmensville, aka No Man's Land, the setting for my first romantic mystery, “Captain Marvelous”.

On another beautiful day in the Fall, I drove Interstate-88 from Binghamton to Albany and discovered the perfect scene of the crime for “Captain Marvelous” where women were murdered, then dumped like pieces of garbage along the interstate which frames the Northern border of the Catskill Mountains. I deliberately created a small, rural town where  social activities center around its festivals, amateur sports, and the local VFW pot luck suppers. I wanted the hero to start out having an elitist big-city attitude who loathes everything about small towns, the unique slow pace, the attitudes and mores, biases and eccentricities.

For my second novel, another romantic mystery, “Try Just Once More”, I chose my favorite vacation spot—Saranac Lake, a town in the Adirondack Mountains of Northern New York, famous for finding cures for tuberculosis prior to the advent of effective meds and spitting distance from Lake Placid and Olympic history. There is such charm here, with many of the cure cottages and cure porches still in existence. I wanted a place for my wounded heroine to run to after she hits bottom, a place that would welcome my wounded hero and give him a home to love.

My third book, “Raising Kane” will be released on September 24th  as part of the anthology, “Out of the Dark”. To enhance the setting, I used my history as a victim advocate when I often took my kids and their friends to Take Back the Night marches, protesting violence against women. I felt the need to introduce the girls to their First Amendment rights as well as the plight of crime victims. The marches were always safe; we always made sure to have a “police presence” along the route. As I planned “Raising Kane”, I had the march evolve into a riot in front of a biker bar. Lots of blood, guts and gore with drunks wielding beer bottles and brick bats. Throw in a few activist nuns and we had ourselves a great party.

Currently I am involved with The Class of '85, an ongoing series for Wild Rose Press. The premise is centered around an invitation to the 25th high school reunion of the class of 1985. To start, we needed to create a small city of about 50,000 with a lot of character, history, and elegant architecture. As so often happens, brilliance strikes when we least expect it. I discovered a small, enclosed neighborhood in the middle of Rochester  complete with stone and brick mansions, cobblestone streets, and tidy, manicured lawns. Ta da! We picked up this neighborhood and dropped it on a bluff overlooking Lake Ontario, Queen of the Great Lakes.
           
Then we needed to create a framework for the high school as it was in 1985, identify the basics [sports, principal, executive secretary, chief custodian]. After identifying the current infrastructure, including social and legal issues plaguing the community, we let the authors take it from there. They embraced it with open hearts. As of September 18, six stories have been released with more on the horizon.

Thanks for stopping by today, Kat!

Remember, readers, if you’d like a chance at winning a copy of
Out of the Dark, post a comment and don’t forget to check back tomorrow to see if you won. -- AP

Thursday, September 23, 2010

FASHION WITH ERICA -- OFFICE NO-NO'S

Fashion editor Erica Milano is back today with some fashion no-no’s when it comes to the office. -- AP

Thanks, Anastasia. Office dress codes have come a long way since the
Mad Men era, but no matter how casual your work place, you should exercise a little common sense and self-control when getting dressed in the morning.

If you want to be taken seriously, you need to look and act your age, not dress like a ‘tween, sk8rgrl, or biker babe. That advice applies to you no matter if you’re a 20-something, like me, or close to retirement. Besides, thigh-high boots, mini skirts, and crop tops are so not a good look for anyone approaching menopause or beyond, whether you’re at work or at the supermarket.

Come to think of it, thigh-high boots, mini-skirts, and crop tops are usually not a good look for most people, no matter how young you are. Take an objective look at yourself in a full-length mirror before you step out of the house. The operative word here being OBJECTIVE. Not only should you be dressing for your age and job, you should be dressing for your body type. Got a muffin top? Trust me, no one wants to see it.

Here are a few other pieces of advice:

-- no editorializing, politicking, or advertising across your chest. Leave the “I’m With Stupid” and Mickey Mouse T’s for the weekends.

-- no exposed skin other than face, neck, arms and legs (no higher than from just above the knee down.) Leave the belly and thigh-baring for the beach. It has no place in the office.

-- you might love your tattoos and piercings, but exercise some common sense, especially if you deal with the public or interface with external business associates. Not everyone appreciates body art, and your boss won’t like it if yours causes him to lose business or an account.

-- have some self-respect. The slut look never works unless you’re a streetwalker. Is that really the image you want to project to the world?

Well…Erica really does tell it like it is, doesn’t she? But you have to admit, there’s wisdom in her words. Our Book Club Friday guest author is giving away a book this week. Post a comment to be entered in the drawing. -- AP

Wednesday, September 22, 2010

MONEY MATTERS WITH SHEILA--GET IN FREE!

Have you gone on a family outing recently? The movies? A major league baseball game? The zoo? What used to be weekly outings have turned into yearly events for most families, thanks to the outrageous entry fees now charged at family-friendly venues. Money guru Sheila Conway is hear today with some exciting news about free events this coming Saturday. -- AP

Thanks, Anastasia. This Saturday, September 25
th, as part of Smithsonian magazine’s annual Museum Day, hundreds of participating museums and cultural institutions across the country will be free to all visitors with a Museum Day ticket. To get your tickets, just go to Smithsonian.com/museumday.

Some of the featured museums include:


  • Littleton Museum, Littleton,CO
  • Mashantucket Pequot Museum and Research Center, Mashantucket, CT
  • Seminole Ah-Tah-Thi-Ki Museum, Cewiston, FL
  • CDC’s Global health Odyssey Museum, Atlanta, GA
  • OZ Museum, Wamego, KS
  • Museum of Fine Arts, Boston, MA
  • Buddy Holly Center, Lubbock, TX
  • World Kite Museum & Hall of Fame, Long Beach, WA
  • Children’s Museum of the Arts, NY, NY
  • Stickley Museum at Craftsman Farms, Morris Plains, NJ
  • California Science Center, Los Angeles, CA
  • Adler Planetarium, Chicago, IL

These are but of few of the places that will be open for free on Saturday. Check out the Smithsonian website where you can search by state to find other museums and cultural venues in your area.


Thanks, Sheila! Who doesn’t like free, right? What are some of your favorite inexpensive day outings? Let’s hear from you. Post a comment this week to be entered into the drawing for a free book from our Book Club Friday guest author. -- AP

Tuesday, September 21, 2010

COOKING WITH CLORIS -- MARINATED ASPARAGUS SPEARS

Asparagus always reminds me of the folksingers Peter, Paul, and Mary. (Noel) Paul Stookey wrote a song about asparagus that I heard once at a concert. I don’t know if it ever made it to any of their albums, but the lyrics are a riot. I tried finding them on the Internet for all of you, but struck out.

My family loves asparagus. However, the price doesn’t always love my pauper’s pocketbook. So when asparagus is on sale, I always buy some. If the weather is too hot to cook, I pull out Cloris’s Marinated Asparagus Spears recipe. Try it; you’ll love it!
-- AP

MARINATED ASPARAGUS SPEARS

1 lb. thin asparagus spears
1/2 cup olive oil
1/4 cup red wine vinegar
2 T. dried, minced onions
1 teaspoon dried dill weed

Wash the asparagus and snap off the tough bottom pieces. Do not dry the asparagus. Place in single row in shallow baking dish. Cover and microwave on high for 2 minutes. While asparagus is cooking, mix olive oil, vinegar, onions, and dill. Drain water from baking dish. Pour oil/vinegar mixture over asparagus. Cover and chill for at least 2 hours before serving.

Serves 6

Thanks, Cloris! I know our readers will love this one. Our Book Club Friday guest author is giving away a book this week. Post a comment to be entered in the drawing. -- AP

Monday, September 20, 2010

CRAFTS WITH ANASTASIA--RIBBON WOVEN ORNAMENTS

It’s never too early to get a jump on the holidays, especially if you make your gifts and ornaments. Here’s an idea for some quick and easy ribbon woven ornaments that are simple enough for tweens to make. Choose your own color palettes. -- AP

Materials:
3/4-yd. each two complimentary patterns/colors of #5 cotton ribbon
3” x 3” (approx.) pre-cut unfinished wood shape (available at crafts stores)
1/4-yd. 1-16th” wide satin ribbon
push pins
tacky glue
acrylic satin varnish
craft knife with new blade
foamcore board

Directions:
1. Cut each piece of cotton ribbon into four equal lengths. Cut each piece in half lengthwise.

2. With wrongs sides up and placing pins at the top short end of each strip, pin 7 strips of one pattern/color side by side onto foamcore board.

3. With wrong sides up, weave a length of second pattern/color over and under pinned strips. Weave the next length of the second pattern/color under and over pinned strips. Continue in this manner for eight rows, making sure ribbons butt up against each other.

4. Apply thin coat of tacky glue evenly to one side of wooden ornament. Place wood, glue side down, over ribbons. Weight down with a  can or bottle. Allow glue to dry.

5. When glue is dry, remove push pins. Trim ribbon around wooden shape with craft knife.

6. Apply 2 coats of satin varnish to front of ornament, allowing varnish to dry between coats.

7. Fold satin ribbon in half. Glue cut edges to top center back of wooden shape for hanging loop.

These ornaments are great for craft bazaars or when you need Santa’s helper gifts for girl scout or cub scout troops, Sunday school, etc. Use them in place of bows on gift packages and baskets or as stocking stuffers. Make an assortment and wrap up with cookies for holiday hostess gifts. How else might you use them? Let’s hear your ideas. Our Book Club Friday guest author is giving away a book this week. Post a comment to be entered in the drawing. -- AP

Saturday, September 18, 2010

THIS WEEK'S BOOK WINNER

Thanks to all who stopped by this week at Killer Crafts & Crafty Killers. We hope you'll come back often and also tell your friends about us. We have lots of exciting posts and guests planned for the months ahead. I’d also like to thank Radine Trees Nehring for being our Book Club Friday guest and offering a copy of A RIVER TO DIE FOR to one of our readers who posted a comment this week. The winner this week is Carol-Lynn Rossel. Carol, if you'd  please email your mailing address to me at anastasiapollack@gmail.com. I’ll forward it to Radine, and she’ll mail your book to you. Happy reading! -- Anastasia

Friday, September 17, 2010

BOOK CLUB FRIDAY -- GUEST AUTHOR RADINE TREES NEHRING

Today’s Book Club Friday guest author is Radine Trees Nehring. Radine is the author of the To Die For mysteries. You can find out more about Radine, read the first chapter of each of her books, and talk with her about Real Place Reality at her website. Her books are available from both brick and mortar and online booksellers. Radine will be giving away a copy of A River To Die For to one lucky reader who posts a comment this week. -- AP


REAL PLACE REALITY
by Radine Trees Nehring

Ahhh...the driveway is shoveled, my frigid toes are thawing in fuzzy slippers, and I have thirty minutes all to myself. Think I’ll begin one of the books I just bought. Um, which one...? Oh yes, that one!

Chapter I, Page 1:
“Summer in Benteen County, Kansas, is a season possessed of all the gentle subtlety of an act of war.... A week ago, the thermometer had risen past the unbearable mark...and, in automatic response, the humidity rushed after it–-to a level technically described as obscene.”

How about it? Would you rather read this description from the opening page of J. M. Hayes’ mystery novel, Mad Dog & Englishman in summer--or winter?
Winter, you say? Me, too, because from the very beginning of that novel, I feel heat. (When it’s hot outside, I suggest enjoying something like Iron Lake by William Kent Krueger, where you can experience a white-out blizzard--and frozen body--in northern Minnesota.)

Good mystery writers are master manipulators, creating atmosphere and location inside minds. They take us to places dark and stormy or glaring and sharp, thrill us with spooky ice caves, steaming jungles and worlds that may be far away or charmingly familiar. The more skillful the writer, the more willing we are to believe, share, travel, and enjoy--riding along eagerly with characters and events that become real for at least the space of a novel.
 
But there is also a real place reality in fiction that goes beyond hot Kansas or cold Minnesota; ice caves or steaming jungles. Novels using real place reality enable us to experience actual locations while we enjoy the entertainment of a mystery being solved there. This type of novel offers a mini-vacation without the expense of travel, (though quite often readers end up wanting to see the described location for themselves.)

When my own fiction writing career was getting under way, I was a relative newcomer to the Ozarks. My husband and I chose Arkansas for our home after spending time thinking about going “back to the land” in several parts of the United States. My love for Arkansas led to an interest in writing about it, and, in a burst of energy, I spent fifteen years selling articles, essays, and poetry about the Ozarks to publications in the United States as well as other countries. After publishing one non-fiction book set here, (DEAR EARTH, A Love Letter from Spring Hollow) I decided to try my hand at writing the type of book I enjoy reading most–-the traditional mystery.

My first effort, A Valley to Die For, (St Kitts Press, 2002) was set in the same country Ozarks area as Dear Earth, an easy location to describe, since I live here. Then, in Music to Die For, I decided to send my protagonist, Carrie McCrite, to another Ozarks spot I love, Ozark Folk Center State Park in Stone County. (Picture Sturbridge Village with an Ozarks setting and Ozarks history, plus a music theater where old-time music can be enjoyed every day the park is open.)

It wasn’t long before I discovered it was not only fun to site books at Arkansas tourist destinations, it was good business. When people ask “Do you have to get permission to use a real place as a book setting?” I report that I do, indeed, get written permission as a courtesy. However, that’s never difficult because the people in charge of such places are often smart enough to realize--as I now have--that an adventure story set in their location is excellent advertising, bringing tourists to see the place where it all happened. Settings in my novels are real enough that, at signings, I give actual tourist brochures and location maps to everyone buying one of my To Die For novels.

Do I really need to tell you I enjoy research? And, not only are people at my various book settings eager to be research assistants, they’re often caught up in the magic of the forming story. They leap into the idea with me, acting out possible plot twists and saying something like: “she could...” or, “what if....”  We have a very good time.

As a mystery reader, I’m excited when I find a new author who takes me into a real place, enhancing it with an adventure puzzle capable of holding my attention. As a writer, I love telling stories set in real places I have chosen to visit, absorb, and share with readers.
 
People frequently ask, "How do you decide on plots to fit your locations?"

Once a location has caught my interest and imagination, the plot rises organically out of the area's history and circumstances present-day.  For example, the plot in A Treasure to Die For, set in Hot Springs National Park, Arkansas, is based on Hot Springs' checkered past as both a spa location and "Sin City."  Ripe for mystery-making? You bet!

This novel had a terrific two-day launch party in the lobby of the historic Fordyce Bath House, where much of the adventure and menace in the story takes place. The Fordyce is now the Hot Springs National Park Visitor Center and Museum. Tourists who purchase my book, A Treasure to Die For, in the Fordyce Gift Shop, sometimes take time to write and tell me what fun it was to follow the plot in a real location. 

This same pattern occurs in all my stories. In A River to Die For, Carrie and Henry travel to Buffalo National River (another Arkansas National Park) where the looting of archeological treasures dating back as much as 10,000 years is taking place present-day. What a plot opportunity!

Journey to Die For (a May, 2010 release by Wolfmont Press) visits the historic Arkansas River town of Van Buren, where a steamboat said to hold a safe full of silver coins was sunk during the Civil War. Carrie and Henry ride the historic Arkansas and Missouri Excursion Train on a pleasure trip to Van Buren, and end up in a tangle of mystery related to long-ago events.
As a reader, I’m always glad when an author uses her or his mind and powers of observation to describe a place so realistically that I’m there. As an author, I simply write about wonderful places as they really are!
And hope you'll join me there.

         Thanks for joining us today, Radine! I know I love books set in real places. What about the rest of you? Have you ever read a book and realized you recognized the locale? Let’s hear from you. Everyone who posts a comment this week is entered into a drawing to win a copy of A River To Die For by today’s guest author. -- AP

Thursday, September 16, 2010

BEAUTY WITH NICOLE-- MAKE-UP EXPIRATION DATES

Make-up is expensive, and if you’re like me, you don’t want to throw out a half-empty container of mascara or bottle of foundation, but beauty editor Nicole Emmerling has some very good reasons why you shouldn’t hold onto cosmetics past a certain point. -- AP

Thanks, Anastasia! Most of us are very conscious about checking expiration dates on food products. We don’t purchase a gallon of milk with tomorrow as a sell-by date, and we toss anything in the fridge that looks or smells odd. Unfortunately, most of us don’t do likewise for our cosmetics. Make-up has a shelf life. It doesn’t last forever, even though most contain preservatives to extend their shelf life. (Note: Natural make-ups contain no preservatives and have a much shorter shelf life.)

Keep in mind that your make-up and make-up applicators come in daily contact with germs from your hands, face, and mouth. Every time you apply make-up, you run the risk of cross-contamination, promoting bacterial growth, and causing infection. That’s why it’s so important to make sure your make-up stays as contamination free as possible.

Below I’ve listed a general guide for various cosmetic products, but here are 5 tips to get you started:

1. Just like with food, if it looks or smells odd, through it out.

2. Toss out anything that’s over 2 years old.

3. Can’t remember when you purchased the product? When in doubt, toss it out.

4. Many products won’t have an expiration date printed on the container. Take it upon yourself to mark the container with the expiration date after you purchase it.

5. Never use your fingers to apply make-up. You’ll contaminate the product in the container. Clean make-up brushes in warm sudsy water every couple of weeks, and use disposable sponge applicators to lessen the growth and spread of bacteria.

Typical shelf life for non-natural cosmetics:

3-4 months
mascara
liquid eyeliner

Up to 1 year
concealer
cream and gel cleansers
water-based foundation
nail polish

Up to 18 months
oil-based foundation
cream blush
cream eye shadow

Up to 2 years
powder
powder blush
powder bronzer
powder eye shadow
pencil eye liner
lipstick
lip liner
lip gloss

Thanks, Nicole! I guess it’s time to toss that purple eye shadow from before the millennium!  Anyone else have make-up that qualifies as an antique? Post a comment to be entered in the drawing for a free book from our Book Club Friday guest author this week. -- AP
 

Wednesday, September 15, 2010

HEALTHY LIVING WITH JANICE--PAPER, PLASTIC, OR E COLI?

Health editor Janice Kerr has some important advice today for those of you who are bringing your own reusable shopping bags to the supermarket. -- AP

Thanks, Anastasia! I’m sure many of our readers are thinking greener lately by choosing reusable bags over paper or plastic. We’re killing less trees and cutting down on landfill waste. In addition, most supermarkets and big box stores give you a certain amount of cash back for using your own bags, and those pennies and nickels add up over time.

So for all of you who bring your own bags, hooray for you! But how many of you wash those bags on a regular basis? How many of you have never thought about washing those bags? A recent study found that 97% of people the people surveyed who use reusable bags have never laundered them.

Shopping bags should be treated the same way you’d treat an food storage containers. You don’t put your Pyrex and Tupperware away without washing them, do you? The same should hold true for your shopping bags. Those bags are perfect breeding grounds for various food borne bacteria. One study showed that nearly half the bags tested contained coliform bacteria, including e coli and in quantities 10 to 20 times the amount found on the average toilet seat. Now that’s disgusting!

So how do you balance what’s good for the environment with what’s good for your health? Here are a few simple rules:

1. To prevent cross-contamination, always separate your items -- meats in one bag, produce in another, dairy in a third, cleaning products in a fourth, etc. Never place any raw foods in a bag that has carried meat products.

2. Never use reusable food bags for any other purposes such as carrying gym clothes, books, water bottles, laptops, etc.

3. Never store your reusable food bags in the trunk of your car. The higher temperatures are a perfect breeding ground for bacteria.

4. Wash your bags regularly in the washing machine, using bleach.


Excellent advice as always, Janice! Thanks for educating our readers.


Our Book Club Friday guest author this week is giving away a copy of one of her books. To be entered in the drawing, all you have to do is post a comment to the blog this week. -- AP 

Tuesday, September 14, 2010

COOKING WITH CLORIS -- POTATO SALAD REDUX


Are you starting to stash zucchini in your neighbors’ mailboxes after dark? The zucchini is begin to come in fast and furiously. Never fear. Cloris has another great potato salad recipe today, also low-fat, and best of all, it includes zucchini. -- AP

LOW-FAT ZUCCHINI POTATO SALAD
Ingredients:
1-1/2 lbs. Yukon Gold potatoes
1 medium zucchini, chopped
1 T. coarse ground mustard
1/2 cup low-fat sour cream
1/4 cup low-fat mayonnaise
1 T dried, minced onion
1 teas. dry dill weed

Clean and cook potatoes, cutting into halves or quarters, depending on size. Allow to cool. In a separate bowl combine mustard, sour cream, mayonnaise, onion, and dill. Add chopped zucchini to potatoes. Add remaining ingredients, blending well. Chill at least 2 hours before serving.

Thanks, Cloris, I’m sure our readers will enjoy this marvelous side dish. I know I did when you made it for me. What about the rest of you? Have any side dishes you'd like to tell us about? Our Book Club Friday guest author this week is giving away a copy of one of her books. To be entered in the drawing, all you have to do is post a comment to the blog this week. -- AP

Monday, September 13, 2010

CRAFTS WITH ANASTASIA--SPOON DOLL PUPPETS


What kid doesn’t love puppets? These spoon dolls are easy to make and make great puppets for impromptu puppet shows. -- AP

Materials
12” wooden spoon; 6-1/2” x 16” piece of fabric; 3” x 4” flesh-colored felt; 3/4-yd. 1-3/4” wide gathered lace; 4” length of 1” wide gathered lace; 1/2-yd. 1/8” wide satin ribbon; acrylic paint: flesh, dk. flesh, pink and black; acrylic satin varnish; paint brushes; curly doll hair; 4” straw hat; 1” miniature butterfly; paint brushes; tacky glue; low-temp glue gun; graphite paper; pencil; basic sewing supplies

1. Paint spoon bowl, sides of bowl, and approximately 1” of the handle below the bowl with 2 coats flesh paint, allowing paint to dry between coats.

2. Print out face and hand patterns, enlarging face pattern box to 1-3/4” wide and hand pattern box to 2-1/4” wide.

3. Using graphite paper and pencil, ransfer face pattern to the bowl of the spoon.

4. Paint the mouth pink. To make eyes and freckles, dip the brush handle end into paint and dot eyes in black and freckles in dk. flesh. Allow to dry.

5. Apply 2 coats of satin varnish over painted areas.

6. Sew a length of wide lace to the bottom long edge of the print fabric. Using a 1/4” seam, sew the short ends of the fabric right sides together. Press under remaining long edge 1/4”.

7. To make the dress, run a gathering stitch along the pressed edge of the fabric. Gather tightly around the spoon directly under the bowl. Apply a small amount of tacky glue to hold the fabric to the spoon at the neck.

8. Gather a 6” length of remaining wide lace. Tie tightly around the neck over the gathered fabric for a collar.

9. Gut two hands from the flesh felt. Glue a hand to either side of the dress as shown in photo. Cut the 1” lace in half. Glue each half over a hand to form cuff.

9. Using tacky glue, glue lengths of doll hair to back and edges of spoon.

10. Using the glue gun, glue hat to the back of the head and butterfly to hat brim.

11. Make a bow from the ribbon. Glue to center front of collar.

Great rainy day activity, right? What else do you do with your kids on rainy days? Let's hear from you. Post a comment to the blog this week to be entered in the drawing for a free book from our Book Club Friday guest author. -- AP